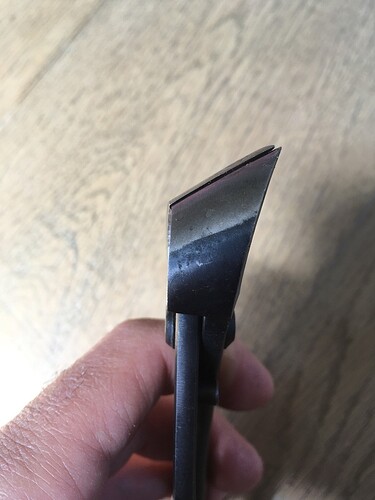
I abused my concave cutters and now the blades don’t line up right. I tightened the pin on the pivot point, which helped a bit, but it’s still out of alignment toward the tips of the blades. Any suggestions?
You need to bend the left side in front of the pivot downward. Not sure what kind of steel you have there, as the black part looks painted. Minimum you need heat, best would be to separate the blades. worth the effort?
I would not heat them - that will most likely destroy the heat treatment of the cutting edge which is normally beyond the hobbyest to recreate for this type of tool. Heck, I am a Materials Scientist by training and have heat treated several cutting tools and would not attempt this one since it is a hard edge on a softer steel body…
Concave cutters are designed so that the cutting edges are parallel, but with a slight overbite. The two cutting edges do not come together, but are just misaligned. You can recreate this with some very careful grinding. If you use a grinding wheel for the first two steps use a very, very light touch since you don’t have much steel to remove (plus you don’t want to overheat the steel and ruin the temper).
- Grind the tip of the left blade down so it is aligned with the right blade. You would see this in in the 2nd view. I took quite a bit of material off one of my concave cutters when I broke both tips off in a drop onto concrete. It makes them easy to distinguish from the others since I use them for roots.
- Grind the edge of the left hand blade very slightly at the bottom so that gap between the blades is even. It won’t take much so a hand stone might be best.
- Sharpen the left hand blade by using a hand stone to remove a little metal from the inside of the bottom of the blade. This looks like it is the inner blade for the overbite which is why you sharpen the inside. If it was the outer blade, you would sharpen from the outside.
- File the pin behind the pivot point (not shown) that controls the gap between the blades when closed. You want a uniform sliver of light.
@antelion Worth the effort, but a consequence of miserliness: I was too cheap to buy root cutters, then ruined my concave cutters nibbling away at big chunks of wood to fit yamadori into containers 
@MartyWeiser Awesome, makes sense. Thanks so much for the detailed instructions. Never would have thought to shave the “backstop” pin. I’ll give it a shot and report back.
Been there. I love my root cutters and they also double as bamboo splitters to make chopsticks.
Not meant to start and argument here. The heat was meant to be used around the pivot area where the upward bent most likely happened. I still feel this is a safer method than the heat risk from an grinder at the blade and trying to reprofile the blades by hand to achieve the correct blade alignment again. + on some of the modern tools the pin is only ornamental and does not really serve the “stopping” function any more. Worth checking before.
I have root cutters as well, but like concave cutters for the stuff that is between scissors and needing the root cutters. Coming in at an angle to the root is far more natural to me than straight on with the root cutters.
Angle the root cutter?
would be a question for a Q&A. Root cutter create a flat cut vs. the v shape f the concave cutter vs. the concave of the knob cutter (or spherical cutter). Is there a reason for roots being cut flat?
I find the concave cutter to be much easier to hold and use as well as liking to approach the roots at an angle - just seems easier to me. I make big cuts with the root cutter so they are flatter and will also do a little clean up of the medium roots when using the concave cutter so the cut is approximately flat. I just have dedicated repotting tools.
Success! Used the dremel and took back the bottom of the undercutting blade, then refinished that cutting edge. Tested it on pruned roots of various sizes, cuts like a dream across the full length of the blade. And you were right @antelion, it wasn’t quite contacting that stopper pin, though it is now.
Thanks for the great feedback!
Congrats! Please come do mine lol.

